Step 0: ask yourself if you really, really, want to do this. You are going to save maybe $50-100 over buying the pocketfolds off of some place like cardsandpockets.com or paperandmore.com. So unless you're going to get more use of the paper cutter after the wedding, or you already have one, this should be something you do because you enjoy this type of DIY project. The total time commitment for 80 invites is probably 10 hours, not counting shopping time.
Okay, so, you're sure you want to do this? Well, let's get rolling.
Materials:
- 12"x12" scrapbooking paper, or, 19"x25"-ish or 22"x28", etc. cardstock or charcoal paper. If you go with paper in dimensions larger than 12"x12", get it cut at the art supply store you buy it from. A good art supply store will have a guillotine cutter that you can use to cut the paper, or they may even do it for you. If you don't get it cut at the art store, you're going to spend hours and hours with an X-Acto knife and a T-square measuring and cutting. It's much faster to use an in-store guillotine.
Good quality poster board cost us $2/sheet and produces 4 envelopes. Scrapbooking paper runs anywhere between $0.24-0.45/sheet for basic colors at Crafter's Toy Box to $4-5 for really fancy patterns. - 14" (or larger) paper cutter. Swingline makes a good one.
- Double sided adhesive such as the Tombow adhesive roller.
- A razor for scoring. You can use an X-Acto knife, but those are usually sharper and you run more risk of cutting all the way through the paper.
- Some additional cardstock that's a different color from your pocketfolds for templating.

I found this was the quickest order to make the cuts.
- Cut the along the long edge (thick line), making one 7"x25" piece and one 12"x25" piece.
- Cut the 7"x25" into two 7"x12" pieces. Throw the 7"x1" piece away.
- Cut the 12"x25" piece into to 12"x7" pieces, and one 12"x11" piece.
- When you get home, use your paper cutter to cut the 11"x12" piece into six 3.5"x6" pieces for the sleeves.
For 12"x12" paper, make one 12"x7" piece, then cut the 12"x5" piece into two 6"x3.5" pieces, and then throw the remaining strip 12"x1.5" strip away.

For other dimensions, you're on your own for laying out the cuts.
Step 2: Cut templates for scoring. You'll need to cut three pieces of cardstock templates
- One 4.75" strip for the main flap
- One 2.25" strip for the upper flap.
- One 4.5" x 3" for the pocket sleeve.
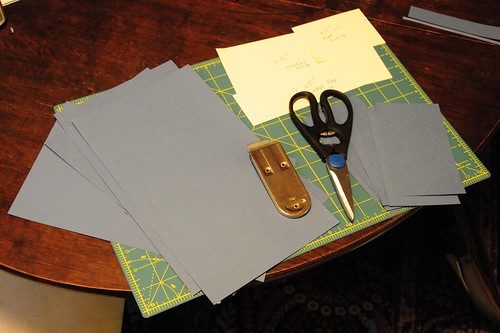 |
| Almost all the materials you'll need: 7"x12" pieces, 6"x3.5" pieces, scissors, and a razor. Adhesive roller not shown |
 |
 |
 |
 |
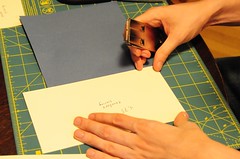
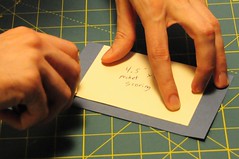
| Scoring the envelope |
 |
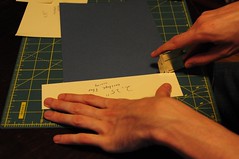
| Scoring the pocket sleeve. |
 |
| Cutting tabs in the pocket sleeve. |
 |
There's no need to be super precise with your cuts here, since the tabs that you're creating won't be visible.
 |
 |
 |
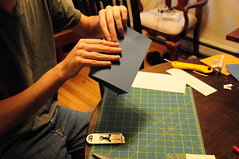
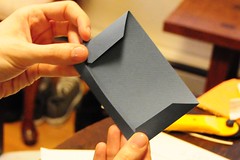
| Folding and attaching the pocket sleeve |
At this point, you're done making the pocketfold! All that's left is stuffing it with information.
Step 7: Put in all of your inserts. The main invite goes in the middle part of the envelope, and all your extras (RSVP card, directions, etc.). Some people like to attach the main invite to the envelope with adhesive. It looks a little fancier that way, but it makes it hard for people who like to put the invite on their fridge. Other attachment alternatives include brads, decorative paper clips, or just leave it as loose paper.
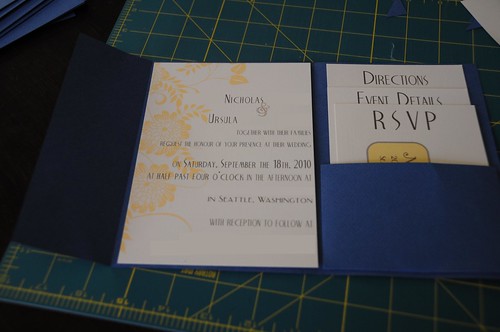 |
| The finished product. |
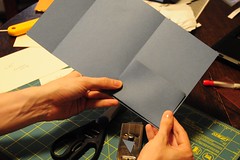
Step 8: Close the pocketfold envelope. Fold the large flap in, then fold the small flap over the large flap. You can use whatever you'd like to hold it closed. We used a tiny wax seal, but stickers, decorative paper clips, etc., would work just as fine.
That's it, you're done! Now just put your pocketfolds into outer envelopes and drop them in the mail!
That's it, you're done! Now just put your pocketfolds into outer envelopes and drop them in the mail!
No comments:
Post a Comment